Beatmaking is often associated with genres like Hip Hop, Trap, Afrobeats, and Amapiano, but the term can apply to any music created with electronic instruments — from House and Techno to Drum & Bass.
Producing music can be as simple or as deep as you want it to be. Everyone approaches it differently — musicians, DJs, and beatmakers all have their own way of turning ideas into finished tracks. But no matter your background, the first step is learning your main tool: the DAW.
What You Need to Get Started
You don’t need a full studio to start making beats. A computer, a DAW, and a pair of headphones are enough to begin.
If you want to expand later, here’s what most producers add:
- MIDI controller – for tapping out drum patterns or playing melodies.
- Audio interface – for recording vocals or instruments.
- Studio monitors – for more accurate sound when mixing.
Start small. The most important thing is learning your tools, not collecting gear.
Step 1: Learn Your DAW
A DAW (Digital Audio Workstation) is the software you’ll use to produce music. It lets you record, edit, and arrange audio and MIDI, add effects, and mix your track.
Some of the most popular DAWs for beatmaking are FL Studio, Ableton Live, and Cubase, though there are plenty of others that work just as well.
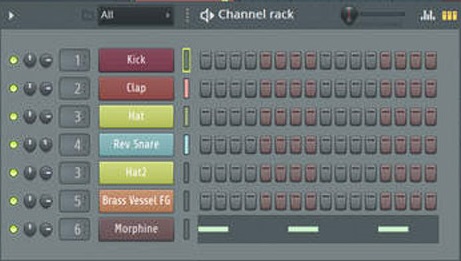
FL Studio is a favourite among beatmakers because of its intuitive step sequencer, which makes programming drums quick and visual.
Ableton Live stands out for its clear FX chain and Session View, where you can trigger loops and sections in real-time — perfect for building and performing ideas.
Whichever DAW you choose, spend time learning how to navigate it efficiently. Once you understand how to record, loop, and arrange, you’ll be able to move quickly from idea to full beat.
FL Studio Sequencer
Step 2: Start with Rhythm
The heart of every beat is rhythm. Once your DAW is set up, start by learning how to build drum patterns.
You can do this by studying existing loops, following drum programming tutorials, or using MIDI packs that show you how different genres are structured.
If you’re using FL Studio, experiment right away. Learn how to read the bars and beats markers. Try a kick on beats 1 and 3 and a snare on beats 2 and 4 — a foundation found in Hip Hop, Pop, and Rock. Adjust the BPM to match your chosen style.
Personally, I like working with MIDI, because it gives you full control over rhythm and melody. Combined with a good software sampler, MIDI lets you reshape grooves and explore different sounds easily.
For a deeper understanding, check out How to Use MIDI.
Step 3: Learn the Basics of Music Theory
Music theory might sound intimidating, but it’s simply a set of tools to help you make better musical choices. Knowing keys, scales, harmony, and rhythm will make your beats sound more intentional and cohesive.
Even a basic understanding of beats and bars, like DJs use, will help you arrange your music and apply quantization properly.
If you’re new to the subject, start with Music Theory for Producers. It’s written with modern producers in mind and covers everything you need to begin building melodies and chord progressions.
Step 4: Use Sample Packs and MIDI Packs
When you’re starting out, sample packs and MIDI packs are some of the best tools you can use to learn and create at the same time.
Sample packs give you ready-to-use sounds — drums, percussion, basslines, and melodies — that instantly show you how a genre is built.
MIDI packs go deeper by revealing the structure of the music itself. You can open them in your DAW to see real chord progressions, basslines, and drum grooves, then tweak them or replace the instruments to make them your own.
Both are educational and creative tools. You’ll learn how rhythms, melodies, and arrangements fit together while producing finished tracks faster.
Explore Sample Packs and MIDI Packs to get started in any style — from House to Hip Hop, and everything in between.
Step 5: Focus on Sound Selection
A great beat often comes down to sound choice. You can have the right notes, but if your samples don’t complement each other, the result will feel flat.
Keep your palette simple. Choose one strong drum kit, one bass, and one or two melodic layers to start with. Focus on how the groove feels rather than how many sounds you can stack.
Sample packs make this easier — the sounds are already processed and balanced, helping you understand what “mix-ready” audio should feel like.
Step 6: From Loop to Full Track
Once you’ve built a strong 8-bar loop, it’s time to arrange it into a full track. Start by dividing it into sections: intro, verse, chorus/drop, breakdown, and outro.
You can duplicate, mute, or remove layers to build energy and variation. Think about how your favourite songs build tension and release. Even small changes — like adding hi-hats or muting a kick — can shift the track’s momentum.
This is where studying MIDI arrangements or sample pack structures becomes incredibly helpful. You’ll quickly spot how professional producers balance repetition and progression.
Step 7: Keep Learning and Experimenting
Beatmaking is a journey, not a checklist. The more you experiment, the more your own style will develop.
Watch YouTube tutorials, read production blogs, and study how different genres handle rhythm, sound design, and structure. Don’t get discouraged by unfinished loops — every session teaches you something new.
For more guides and walkthroughs, visit the Transmission Samples Tutorials page. It’s packed with tips to help you improve your workflow, learn rhythm, and develop your ear.
Ready to Start Making Beats?
Once your DAW is installed and you’ve learned the basics, dive straight in. Don’t wait for the perfect idea — make a simple loop today.
Download from our selection of Free Samples & Midi Packs for an introduction to high-quality sounds, arrangements, and compositions.
The best producers started by experimenting. You’ll be surprised how quickly your skills grow once you start making music regularly.